LAP documentation
Changelog
Current version: 0.3.6
- 0.3.6: Disable Interstitials by settings the
interstitialIntervaloption to0 - 0.3.5: Change sizes of close-button in Interstitial
- 0.3.4: Add
lap.getInterstitialAdmethod
Index
Installation
The very first step you need to do is to install the package. You can do that by adding the following line to the head
tag in the html files:
<head>
...
<script src="https://cdn.jsdelivr.net/npm/lap-core-js"></script>
</head>If you want to use a specific version, you can do that by adding the version number to the url:
<head>
...
<script src="https://cdn.jsdelivr.net/npm/lap-core-js@<version>"></script>
</head>We recommend using the latest version, which is 0.3.6 at the moment, and keep it updated.
Either, if you are using a bundler, you can install the package by running the following command:
npm install lap-core-js
WordPress
We are happy to announce that we have created a WordPress plugin for LAP. You can find it here.
You can install it by going to the Plugins tab in your WordPress dashboard and clicking on Add New. Then, search for LAP API and install it.
After installing the plugin, you need to activate it. You can do that by going to the Plugins tab in your WordPress dashboard and clicking on Activate.
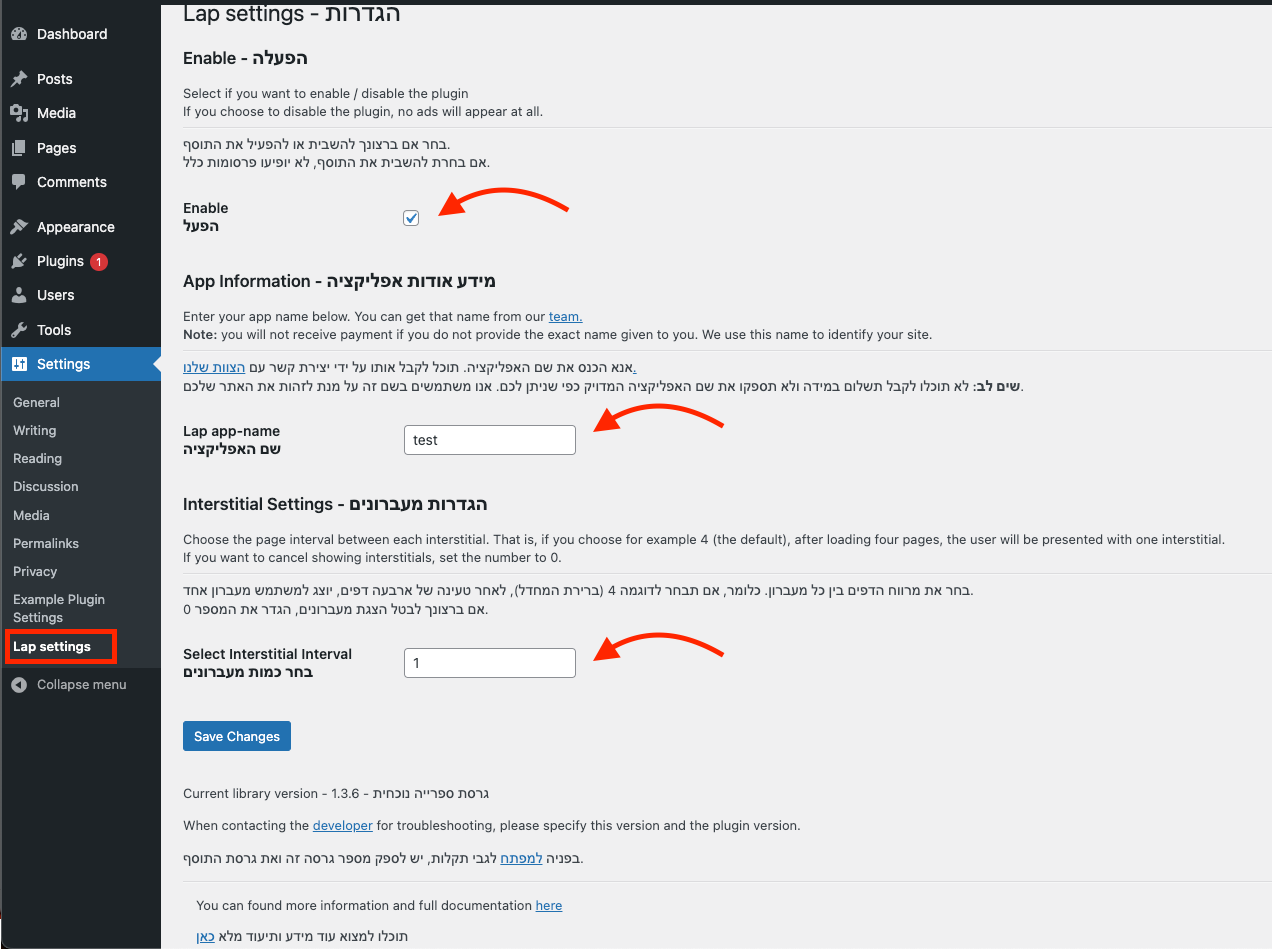
After activating the plugin, you need to go to the Settings tab in your WordPress dashboard and click on Lap Settings. There, you will find the settings for the plugin.
Right now, the plugin supports the following settings:
- Enable/Disable LAP. Simply check the box if you want to enable LAP.
- Setting up the app name.
- Setting up the Interstitial interval. This is the interval between each interstitial ad. The default value is 4.
Stay tuned for more updates!
How to use
We expose a global variable called lap which is the main object of the library.
You need to initial as explained in the Initialization section.
After the initialization, you will receive a lap object which you can use to set up the ads.
Initialization
After we have installed the package, we need to initialize it. We can do this by adding the following lines to the very
end of the body tag in our html files.
<body> ... <script> lap.init("YOUR_APP_NAME", { // options }); </script> </body>
We pass the name of our app as the first argument and an object with options as the second argument. The options are optional, and we can leave them out if we don't need them. later we will see what options we can use.
You need to replace YOUR_APP_NAME with the name of your app as it is given to you by the LAP team.
In case you don't have an app name yet, you can contact us by sending an email to ads@hadran.net.
The lap object singature is as follows:
interface Lap {
version: string,
app: string,
getVideoAd: (type: VideoType) => string,
getAudioAd: () => Promise<AudioAdData>
}Note: If you are using typescript, the types definitions are available here.
Setting up
Lap - Lomdaat ads platform - provides three types of ads:
- Auto ads: e.g. Interstitial ads
- Predefined ads: e.g. Banner ads, Native ads
- Code-based ads: e.g. Audio ads, Video ads
Let's see how we can handle each of them.
Auto ads
Interstitial ads
Auto ads are ads that are automatically shown to the user. for example, an interstitial ad that is shown to the user
after a certain amount of page views.
To set the amount of page views, we need to use the interstitialInterval option. We can do this by adding the
following line to the options object.
lap.init("YOUR_APP_NAME", {
interstitialInterval: 5
});The above code will show an interstitial ad to the user after every 5 page views.
If you don't want to show an interstitial ad, you can set the interstitialInterval option to 0.
The default value of interstitialInterval is 4, you can leave it out if you want to use the default value.
You don't need to do anything else to show auto ads to the user, but you can show an interstitial ad manually by calling the getInterstitialAd method.
lap.getInterstitialAd();
Predefined ads
Predefined ads are ads that you need to define in your html files.
All predefined ads are defined by a div tag with a specific data-lap attribute.
Lap provides two types of predefined ads:
Banner ads
Banner ads are ads that are shown to the user in a specific place in your page. for example, a banner ad that is shown
to the user at the top of the page.
To show a banner ad to the user, we need to define a div tag with the data-lap-b attribute set.
<div data-lap-b></div>
The above code will show a banner ad to the user in the place of the div tag, with the default options.
Banner sizes
You can set the size of the banner by setting the data-lap-b attribute to the size you want, based on the table in the bottom of this page.
<div data-lap-b="C"></div>
The above code will show a medium rectangle banner ad to the user in the place of the div tag.
Auto render
By default, banner ads are not rendered automatically. You can set the data-lap-b-render attribute to auto to render
the banner ad automatically.
<div data-lap-b="B" data-lap-b-render="auto"></div>
See styling section to see how you can style and position the banner ad.
Native ads
Native ads are ads that look like a part of your page. for example, if you have a list of articles in your page, you can show a native ad in the middle of the list, and style it to look like a part of the list.
Lap provides you the data of the native ad, and you can style it however you want. You can use the data-lap-n
attribute to define a native ad.
<div data-lap-n></div>
And that is it.
See styling section to see how you can style a native ad.
Code-based ads
Code-based ads are ads that you need to define in your js files. for example, an audio ad or a video ad.
Lap provides you the data of the code-based ad, and you can use it with your favorite audio/video player. You can use
the Lap object to get the data of the code-based ad.
Audio ads
To get the data of an audio ad, you need to use the getAudioAd method of the Lap object. this method required your
app-name as the app parameter, and returns a promise that resolves to an object with the following properties:
interface AudioAdData {
id: number,
name: string,
url: string,
image_url?: string,
audio_url: string,
campaign: number,
impression_url?: string
}
export declare function getAudioAd(app?: string): Promise<AudioAdData>;Lap.getAudioAd("<app-name>").then((data) => { // do something with the data }); // or with async/await const data = await Lap.getAudioAd("<app-name>");
Note that you need to report the impression of the ad, in order to get paid for the ad.
To report the impression of the ad, you need to use the impression_url property of the data object, and send
a POST request to it.
Lap.getAudioAd("<app-name>").then((data) => {
fetch(data?.impression_url, {
method: "POST"
});
});Video ads
To get the data of a video ad, you need to use the getVideoAd method of the Lap object. this method required your
app-name as the app parameter, and the type parameter, which is the type of the video ad you want to get, and
returns an url. the type parameter can be one of the following values:
vmap: VMAP video advast: VAST video ad
declare type VideoType = "vast" | "vmap"; export declare function getVideoAd(type: VideoType, app?: string): Promise<string | null>;
Lap.getVideoAd("vmap", "<app-name>").then((url) => { // do something with the url });
The url contains the data of the video ad in xml format, and you can use it with your favorite video player.
Note that you need to report the impression, by the url located in the Impression field, in order to get paid for
the ad.
Styling
Banner ads
You can style a banner with your favorite css framework. Lap sets the class lap-b-container to the container div which
sets with the data-lap-b attribute, and the class lap-b-iframe to the actual banner div.
Hide the banner ad by setting display, visibility, etc. - will not hide the ad, and you will not get paid for it.
You can apply the position of the banner, border, etc.
.lap-b-container { position: fixed; top: 0; left: 0; right: 0; z-index: 9999; } .lap-b-iframe { border: 1px solid #000; }
Also, you can animate the banner, just like any other element.
.lap-b-container { animation: slide-down 0.5s ease-in-out; } @keyframes slide-down { 0% { transform: translateY(-100%); } 100% { transform: translateY(0); } }
Interstitial ads
Lap already sets the styling of the interstitial ad, and you don't need to do anything.
Native ads
For the native ads, you must set the styling of the ad, and you can use your favorite css framework to do so.

In the above image, you can see the structure of the native ad, and the classes that Lap sets to the elements.
Lap wraps the title and the content with a div, and the container div has flex display, and column direction.
Here is an example of styling the native ad with flexbox:

You can see other examples in the demo page.
As you can see, we added a label to the native ad, to tell the user that it is an ad, and we also changed the layout into two rows.
Lap didn't set almost any styling to the native ad, in order to give you the freedom to style it however you want, and customize it to your needs.
Contact
If you have any questions, you can contact us at yehudab@hadran.net.